SPACKLING 
 Prep-Paint---Caulking
On the immediate pages that follow, the TECHNIQUES that are described take lots of practice to master... If you can find a place to practice it helps...
 Be sure to use Sherwin Williams Spackling Paste ( use the regular type [water-base] as shown in the
picture... do not use the light-weight non-shrinking type )
Be sure to use Sherwin Williams Spackling Paste ( use the regular type [water-base] as shown in the
picture... do not use the light-weight non-shrinking type )
- Always try to keep the lid on the can of spackle or it becomes too hard to use properly...
sometimes
- If the compound "drys out" you can try adding a few drops of water to the contents of the
can, assuming you are using the recommended water-base compound (oil-base compound should be used ONLY for Exterior Work)
- First CLEAN the crack or hole by scraping away loose paint chips or plaster or wood...

- Use TWO flexable Spackling knives. Load Spackle from the can onto the wider 5in knife and use the second 2in knife to pick-up
spackle from the first 5in knife (using it as a "palette" to work from). Now swipe over the crack or hole with your 2in knife, to fill it leaving some excess
above the surface, then swipe a
second time with your blade angled more vertically to the surface and remove ALL the excess
Spackle, leaving the crack or hole filled with Spackle and a SMOOTH surface. It's a TWO step
opeation... See Pictures Below
- For wider areas, swipe using the 5in knife...
- You can sand lightly if necessary, but if you do it correctly sanding will be optional
- Keep workng the two knives together to keep the mixture "ready". When it gets too "stiff"
or "dry" to work with, scrape it off and get some fresh Spackle from the can
- For "Light Spackling" you can Paint over the repair right away... for "Thicker Applications"
you need to wait for the material to dry internally (usually 1/2 hour)...
- Some "Deep" or "Wide" repairs require two or more applications with 15 min to 1/2 hour
dry time between them... HINT: Stick some PUTTY into the area first, then Spackle over it...
- Use Joint Compound only when you have LARGE Wide Areas (use a small piece of cardboard as a palette to hold the Joint Compound and apply it with a small Trowel), such as for major drywall repairs...
and then after it drys (usually 2-5 hours) go over the area with Spackle to get the imperfections filled in!
- IMPORTANT: If you are going to Top Coat with any type of Sheen Finish like Semi or Satin or
Gloss... you MUST Stain Seal the repair first using Pigmented Shellac or the Spackle will turn the
Top Coat "Dull" ... using a Flat Finish does NOT require this Priming...
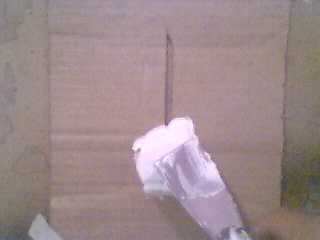 On the "first swipe" you fill the crack, leaving some excess above the surface...
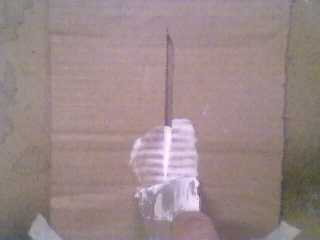 On the "second (or third if necessary) swipe" you angle your blade more vertically and remove all the excess, leaving only
the crack filled with Spackle!"
On the "second (or third if necessary) swipe" you angle your blade more vertically and remove all the excess, leaving only
the crack filled with Spackle!"

Prep-Paint---Caulking

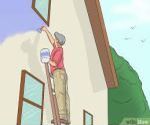
 The best
all-around Step Ladder to use is a WOOD 4 Foot Single Stage Ladder... aluminum is TOO light
for this size and might tip over if "bumped"! [read all the tips]
The best
all-around Step Ladder to use is a WOOD 4 Foot Single Stage Ladder... aluminum is TOO light
for this size and might tip over if "bumped"! [read all the tips]
Copyright © 1998-2026 Paintahouse®All Rights Reserved
SEARCH SITE
Goto Daves Homepage