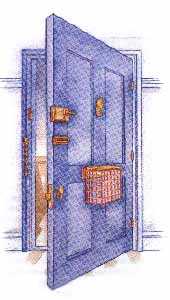
DOORS
 Door Trim---Kitchen Cabinets
We will assume that we are painting a
previously painted wooden DOOR
(slab, panel, loover, bi-fold or even cabinet doors)... SEE Diagram at bottom...
- NOTE: It is usually not necessary to remove Doors in order to Paint them (even Cabinet Doors)...
- Doors like other Woodwork Trim should be Painted with a SEMI-GLOSS Finish...
- First remove hardware that is easily removed (handles, hooks, tie-racks, mirrors etc) but leave the Handles on Slab Doors...
- Next slide a large plastic garbage bag under the Door for floor protection and place a Dropcloth under the area to work over...
- Clean off any Grease with a rag and Lacquer Thinner
- Next SCRAPE off loose paint and other areas that need it... use your stiff Putty Knife...
- Next SPACKLE any Dents or areas that need it and CAULK all visible cracks... including around any window glass if the Door has any...
- Next drive-in any nails with a nail-setter and PUTTY the holes flush to the surface...
- Now Position your FOUR-FOOT Step Ladder at a place to allow you to set your paint bucket on it so that you don't have to bend over each time you need paint...
- Now STAIN-SEAL (using Pigmented Shellac) all SPACKLED areas... and areas where the Paint is thin or worn-down or stained with marks...
- After it's dry (about 5-10 min) you can lightly sand all surfaces using a fine grade paper...

- Do NOT use TAPE to help keep Paint off of surfaces (like Door Knobs or Window Panes), it is not needed if you learn proper
Brushing Techniques, and will cause more work when you remove it, since Paint easily
seeps underneath...
- Now using a 2½ inch flat-edge long handle Brush start Painting (BRUSHING) with the upper "side edges" working DOWNWARDS to the bottom, then Brush across the Top "face edge" and around any Handles, Hinges, Paneling Styles, Windows or Loovers (brush them starting with the left and right loover edges from top to bottom, then finish brushing across each loover working from top to bottom)... then Brush across the Door's bottom "face edge"... Hint: Do not "overwork" your Brush... Let the paint "FLOW" onto the surface!
- Now using a ROLLER with a Short-Nap Cover (¼in to ½in) ROLL the wide face areas and go over your Brush marks as much as possible...
- Now go to the Other Side of the Door and do it the same way...
- Finally come back to the first side and lightly with not much new paint on the roller cover (use a "Dry Roller") ROLL over the entire Door again to give a "Fine Finish" (Fine Stipple)... Repeat on the Other Side of the Door...
- Check over all your work for drips and misses...
- Clean-up
- Remove garbage bag and dropcloths... Be CAREFUL to fold-in droppings, chips etc. and shake out drops somewhere else
- Replace furniture. NOTE: Acrylic paint needs 1-3hrs to dry to the touch and 14 days to "cure" hard

Door Trim---Kitchen Cabinets

 Instead of
pouring solvent directly onto your Hands for Cleaning-Up... pour it onto a RAG then use the
RAG to clean-up your hands! [read all the tips]
Instead of
pouring solvent directly onto your Hands for Cleaning-Up... pour it onto a RAG then use the
RAG to clean-up your hands! [read all the tips]
Copyright © 1998-2026 Paintahouse®All Rights Reserved
SEARCH SITE
Goto Daves Homepage