


HTML Tutorial 1 
Using a Text Editor
 This lesson will assume that you have studied HTML at one or more of my recommended Design Sites ...if you haven't done that yet, go do it and return here
and I will show you how to use your Windows-Based PC running Windows 11 OS, to actually create an HTML Document
using your Text Editor ( use Note Pad ie Start>All Aps>Note Pad )!
This lesson will assume that you have studied HTML at one or more of my recommended Design Sites ...if you haven't done that yet, go do it and return here
and I will show you how to use your Windows-Based PC running Windows 11 OS, to actually create an HTML Document
using your Text Editor ( use Note Pad ie Start>All Aps>Note Pad )!
Once you learn this proceedure you will have an HTML Document on YOUR PC and you can open it in your web browser to see what it looks like... by using your browser's Browse Function to locate it (it will reside currently in your MyDocuments Folder or wherever folder you chose to save it in)!
However you MUST understand that NO ONE on the WWW will be able to view it from their web browser until you UPLOAD it to your chosen Online Web Host Server...
This UPLOADING will be discussed in my Next Lesson using any FTP Program that you choose...
OK... now to build your HTML Document... from your PC Desktop (running Win 11 OS, Version 24H2), open Note Pad
Here's how to make a shortcut to Notepad on your Win 11 (Version 24H2) Desktop... from your PC Desktop right click>new>shortcut>type in Notepad>next>type in Notepad again>finish
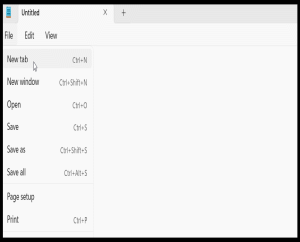
Now click open the top left file button in Notepad, and click "New Tab"
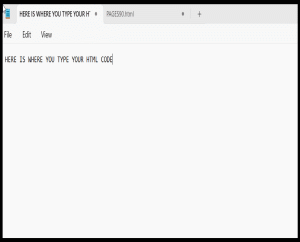
Now here's where you use your knowledge of HTML, and build your Source Code for the web page!
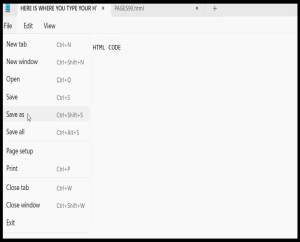
Whenever you want to Save the work, click the top left button and choose "Save As" ...
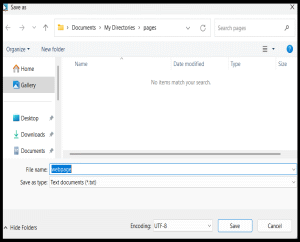
Then on the next window you can delete the blue highlited name and type in whatever name you want, making sure you end it in .html, and at the top you can select where you want to save it, finally click the SAVE Button and you are done...
Well that's it... you now have an HTML Document located on your PC... you can browse to it and check it out!
If you are using Windows 11, watch the Movie below for an example with that Operating System:
You can open your web browser, select File, then select Open, then Browse to the Folder and select your HTML Document and it will be viewable in your browser, however it will only have the basic font style, and text that your browser has for default, later you can add HTML code to change this! At this point your HTML Document does NOT have an actual URL (web address) it only has a file location on YOUR PC (probably C:\Documents and Settings\MyFolder\webpage.html)! IMPORTANT: Most online Web Hosts REQUIRE that you name your very FIRST page "index.html"
Remember when you use your text editor on your PC (I recommend using Note Pad ) to make HTML Changes to your HTML Documents you must be sure to click Save from the File button on the menubar! And every time you change a file, you must use your FTP Program to Upload it to your online Host Server (See Next Lesson)... and when you use your web browser to view the changes, you probably will need to Refresh the page, since the old version will most likely be Cached by your browser...
In the Next Lesson I'll show you how to Upload it to the WWW using an FTP Program so that ANYONE on the WWW can view it in their web browser and so that it will have an actual URL (web address)!
Continue with help pages...use the links below...